| Document number | Revision |
|---|---|
| DOCU13387 | 3 |
Introduction to Schema Customizations
Introduction to Schema CustomizationsBackgroundDirectory of Standard Schema FilesSchema FundamentalsElement mergingFile merging (include schema files)Merge attributesAvailable merge attributesExamplesGuidesHow to apply changes to Highstage using XML schemas
Background
This article will introduce you to fundamental concepts that are related to customizing Highstage using structured XML schemas

Highstage makes use of XML (Extensible Markup Language), a simple text-based format representing structured information, for defining and customizing the layout, behavior and functionality of the system to your exact needs.
Highstage comes bundled with predefined and preconfigures XML schemas, providing you with an out-of-the-box system to be taken into use immediately. You can subsequently add, modify or remove any schema customization to suit your needs.
Please visit developer.mozilla.org, w3school.com, or support.microsoft.com to learn more about standard XML concepts, structure, and syntax.
Directory of Standard Schema Files
Highstage uses a single root XML schema file as a starting point for all Highstage customizations.
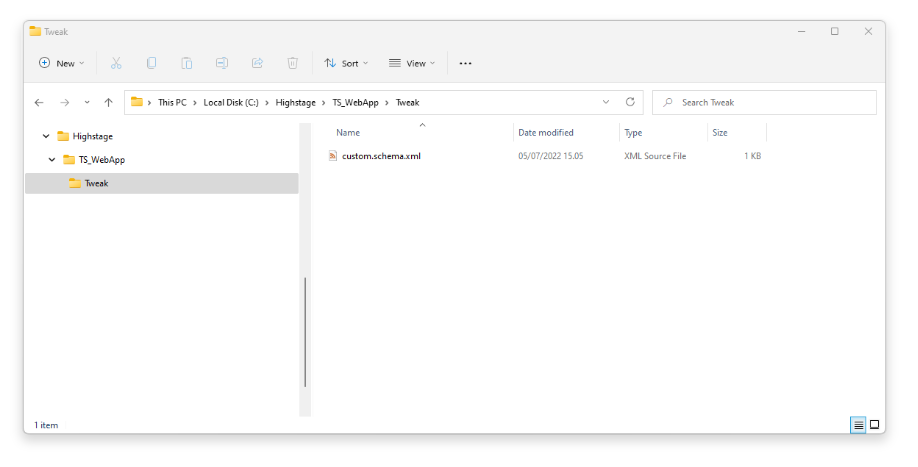
The root XML schema file is named custom.schema.xml by default, and is located within a folder titled tweak on the dedicated server where Highstage is installed (.../Highstage/TS_WebApp/tweak/custom.schema.xml):
The contents of the tweak folder, as well as the custom.schema.xml schema file, are the basis for the unique customizations that are included to configure the Highstage system. It is possible to include other schema files to be able to structure all of the Highstage customizations into separate schema files- and folders as they grow over time.
Please click here for a full overview of XML schema configurations (elements and attributes) that are available for customizing Highstage.
Note: It is possible to change the folder directory, as well as schema file, that is used as a basis for customizing Highstage using system parameters. Set TweakPath to update the location of the dedicate tweak folder or set SchemaFile to assign a specific root schema file.
Click here to read more about Highstage parameters.
Schema Fundamentals
Highstage provides you with a powerful way of customizing Highstage using XML schemas. It enables you to easily add, modify, inherit, or delete existing schema customizations to alter your Highstage system.
Here, you will be introduced to the basic principles of how schemas and their contents are merged together and resolved to form the resulting schemas that forms the basis for how Highstage looks and functions.
Element merging
All XML elements throughout Highstage schema files (with very few exceptions) must have a name attribute associated with it. When changes are applied (by resetting Highstage and/or initiating a schema apply), all schemas will be resolved and merged together, so that a single resulting XML schema file defines the functionality, layout and behavior of Highstage.
Elements sharing the same name will be merged together to form the resulting schema.
Merging and adding elements
The following snippet illustrates how two distinct <type> elements and its child elements are merged together to form the resulting schema (as they share the same parent element name):
x<type name="doc"> <form name="default" title="Default" /> <form name="advanced" title="Advanced" /></type>
<type name="doc"> <form name="raw" title="Raw" /></type>Resulting schema:
xxxxxxxxxx<type name="doc"> <form name="default" title="Default" /> <form name="advanced" title="Advanced" /> <form name="raw" title="Raw" /></type>
Merging and overwriting/changing preexisting elements and attributes
It is also possible to overwrite any preexisting element and/or attribute by defining an element with the same name. Standard behavior is that when two elements are merged, the attributes from the second element will overwrite the attribute values of the first element.
The following snippet illustrates how a preexisting <type> element can have its title attribute overwritten in the resulting schema by defining an element using the same name:
xxxxxxxxxx<type name="doc" title="Documents" description="Written documents in Highstage" /><type name="doc" title="Records" />Resulting schema:
xxxxxxxxxx<type name="doc" title="Records" description="Written documents in Highstage" />Important: Note that the order of defined XML schema elements are merged and resolved from top to bottom. Thereby, elements and their definitions that appear last in the schema files are the ones that applies.
Merging and adding/supplementing preexisting elements and attributes (lists)
It is also possible to supplement existing attributes instead of overwriting it entirely. This is relevant, when you want to add new entries to a preexisting list. In this manner, when elements are merged, the value will be concatenated with the preexisting value. This is achieved by specifying += before the attribute value.
The following snippet illustrates how a preexisting <column> list element can have its available list values supplemented in the resulting schema instead of being overwritten entirely:
xxxxxxxxxx<type name="doc">    <column name="importance" title="Importance" values="Low;Medium" /></type>
<type name="doc">    <column name="importance" values="+=High" /></type>
Resulting schema:
xxxxxxxxxx<type name="doc"> <column name="importance" title="Importance" values="Low;Medium;High" /></type>
File merging (include schema files)
It is possible to include other schema files (as an addition to the root schema file) to be able to structure all of the Highstage customizations into separate schema files- and folders as they grow over time. This is achieved using the <include> element where a specific merge prioritization and ordering are enforced and applied.
Please click here to read more about configuration and usage of the
<include>schema element.
Within individual schema files, all included schemas will be merged and resolved in the order that they are defined (from top to bottom). In other words, if a schema file contains numerous <include elements, each one is resolved and merged in the order in which they are included.
It is also possible to include additional schemas from other included schemas. In this manner, we introduce a structure/hierarchy of included schemas that branches out from the root schema file (custom.schema.xml).
Highstage resolved and merges included schemas using a "bottom to top" approach. This means that Highstage merges and resolved included schemas from the bottom 'level', and will continue to merge included schemas in each 'level' until the root schema file is finally reached and merged.
The following illustration provides you with an overview of schema definitions that makes use of the <include> element and highlight the order in which they are resolved and merged into the resulting schema master.schema.xml:
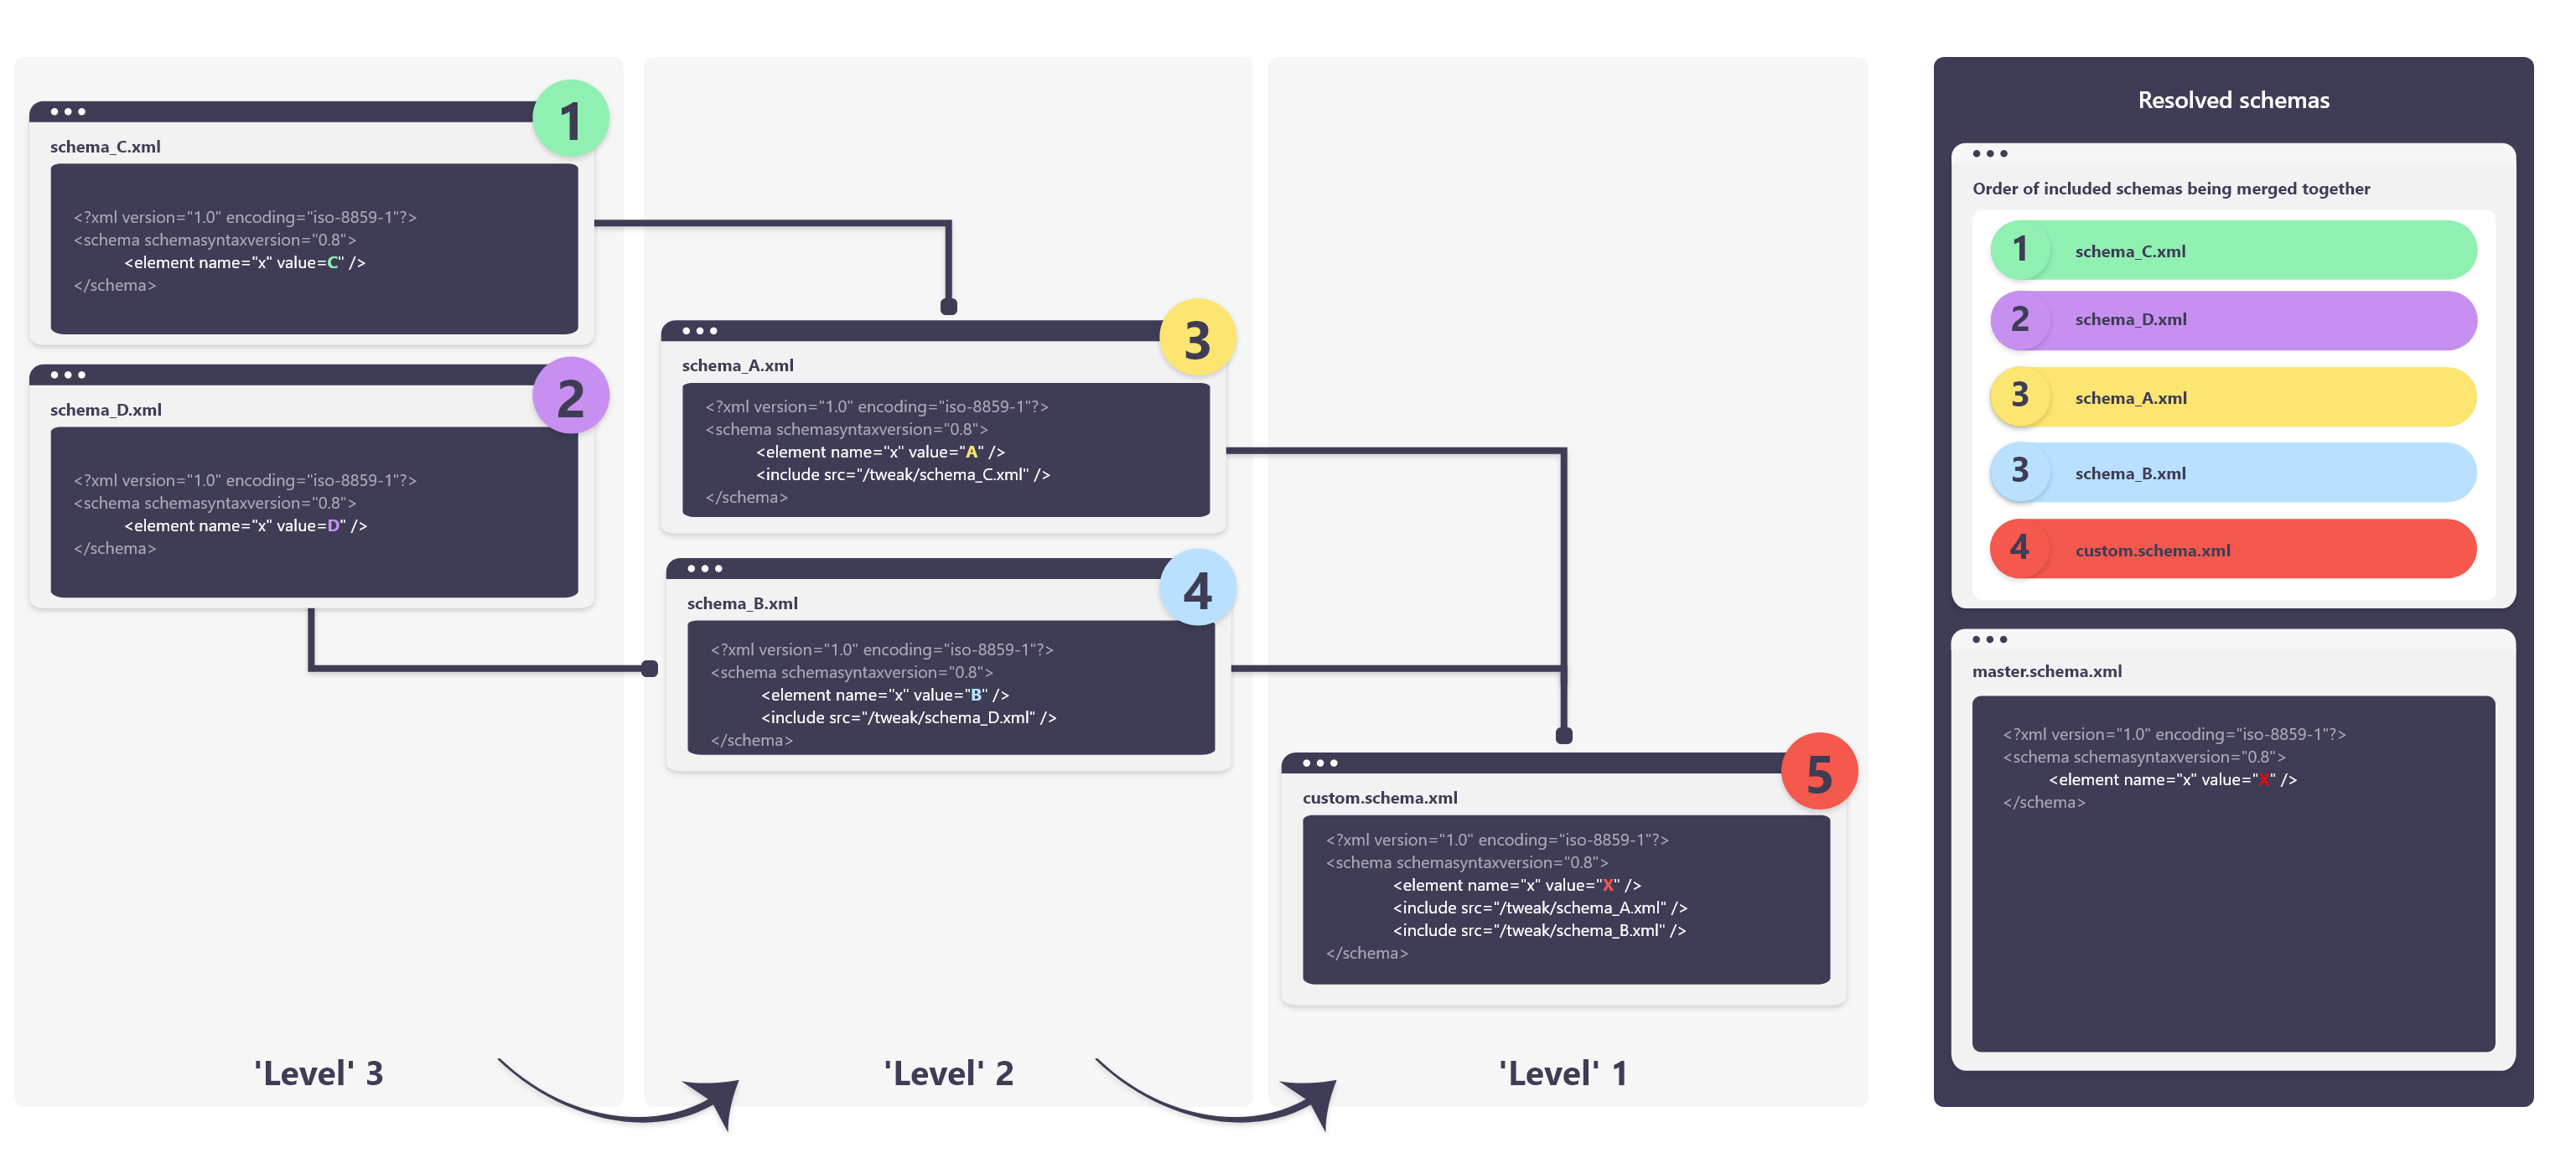
In this example, we overwrite the value of the element x in each individually included schema to demonstrate how included schemas are resolved. Observe that later merged and resolved schemas will overrule/overwrite preexisting schema definitions that has already been merged and applied.
Merge attributes
A merge attribute is an attribute that can be applied to any schema element in Highstage to:
- Overwrite preexisting schema element definitions.
- Alter the order of resolved schema elements.
- Delete preexisting schema element definitions.
- Inherit (reuse) and extend existing schema element definitions.
Available merge attributes
The following list of merge attributes are available:
| Name | Description | Values |
|---|---|---|
_before | Change the order of elements in the resolved schema, so that the current element appears before the preexisting element specified by name, instead of being appended to the end. | <element name> |
_delete | Deletes the current element (including child elements and attributes) by removing it from the resolved schema. The element is deleted after the complete schema has been merged, so the _delete attribute may be altered at any place in schema and the resulting value will determine if the element is deleted or not. | 0/1 |
_inherit | Inherits the elements and attributes from the list of element(s) specified by name that are defined from preexisting element definitions. | <list of element names> |
_overwrite | Overwrites/replaces the current element (including child elements and attributes) so that nothing is inherited from previous element definitions. | 0/1 |
Important: Please note that for the
_beforeand_inheritmerge attributes, the permitted values must be named schema elements that has a sibling relationship to the schema element where the merge attribute is defined.A sibling relationship exists when two schema element shares the same parent element and is on the same tree level in the XML schema structure.
Examples
Using _before to change order of elements
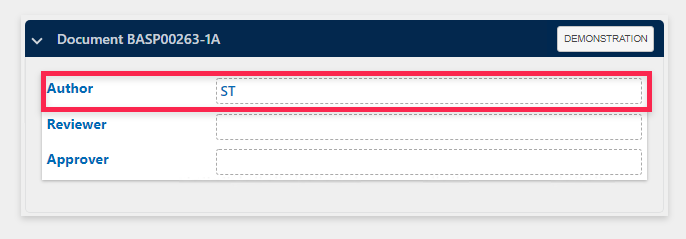
In custom.schema.xml, the following sample utilizes a _before merge attribute on the author field element, where we specify that the resolved schema should include it before the reviewby field element:
xxxxxxxxxx<type name="doc"> <form name="demonstration"> <field name="reviewby" /> <field name="approveby" /> <field name="author" _before="reviewby" /> </form></type>The resolved schema when changes are applied are now enforcing the order of elements:
xxxxxxxxxx<type name="doc"> <form name="demonstration"> <field name="author" _before="reviewby"/> <field name="reviewby"/> <field name="approveby"/> </form></type>The resulting view in Highstage now lists the author field before the reviewby field (despite the order of elements in our schemas being in a different typed order):
Using _delete to remove/delete a preexisting element
In custom.schema.xml, the following sample utilizes a _delete merge attribute on the author field element to delete it altogether:
xxxxxxxxxx <type name="doc"> <form name="demonstration"> <field name="note" /> <field name="approveby" /> <field name="author" _delete="1" /> </form> </type>The resolved schema when changes are applied are now enforcing that the author field is deleted:
xxxxxxxxxx<type name="doc"> <form name="demonstration"> <field name="note" /> <field name="approveby" /> </form> </type>The resulting view in Highstage now excludes the author field element as it has been deleted from the resolved schema altogether:

Using _inherit to inherit/reuse preexisting element and attribute definitions
In custom.schema.xml, the following sample utilizes a _inherit merge attribute on the result form element to inherit preexisting elements and attributes that are associated with the preexisting named demonstration and primary form elements:
xxxxxxxxxx <type name="doc"> <form name="demonstration"> <field name="note" /> <field name="approveby" /> <field name="author"/> </form>
<form name="primary"> <field name="reviewby" /> </form>
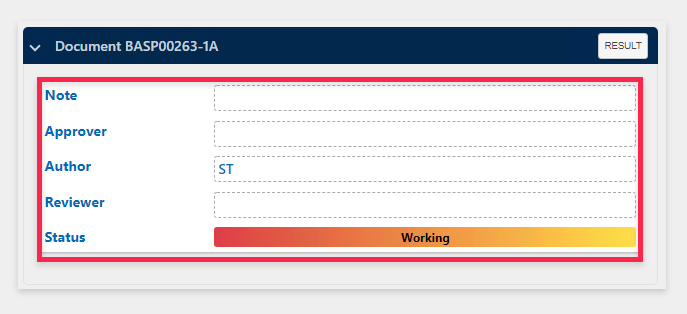
<form name="result" _inherit="demonstration;primary"> <field name="status" /> </form> </type>The resolved schema when changes are applied and is now resulting in a result form element that includes all preexisting elements and attributes that are associated with the demonstration and primary form elements:
xxxxxxxxxx<type name="doc"> <form name="result"> <field name="note"/> <field name="approveby"/> <field name="author"/> <field name="reviewby"/> <field name="status"/> </form></type>The resulting view in Highstage now introduces a result form that includes all fields that was inherited from the demonstration as well as the primary form (in addition to its own defined schema elements):
Using _overwrite to replace the elements and attributes from a preexisting element
In custom.schema.xml, the following sample utilizes an _overwrite merge attribute on the demonstration form element to overwrite the preexisting demonstration form element (including child elements and attributes) so that nothing is inherited from previous element definitions:
xxxxxxxxxx <type name="doc"> <form name="demonstration" title="Demonstration"> <field name="note" /> <field name="approveby" /> <field name="author"/> </form>
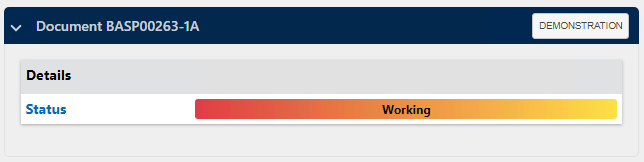
<form name="demonstration" title="Details" _overwrite="1"> <field name="status" /> </form> </type>The resolved schema when changes are applied and is now resulting in a demonstration form element where any preexisting definition (including elements and attributes) are replaced:
xxxxxxxxxx<type name="doc"> <form name="demonstration" title="Details" _overwrite="1"> <field name="status"/> </form></type>The resulting view in Highstage now introduces a demonstration form that only includes a status field element:
Guides
How to apply changes to Highstage using XML schemas
To customize Highstage, you must update the schema file custom.schema.xml or any other included schema, that is located within the tweak folder on the dedicated Highstage server.
To make changes to Highstage using schema customizations:
- Navigate to an appropriate schema file on the dedicated Highstage server (e.g.
custom.schema.xml): - Open the schema file using a dedicated source code editor (e.g. Notepad, Notepad++, Visual Studio Code).
- Perform the configuration be included and implemented into Highstage and save your changes.
Info: Click here for a full overview of XML schema configurations (elements and attributes) that are available for customizing Highstage.
- Navigate to Highstage and click Reset from the top navigation menu for all changes to be applied (requires a miminum userlevel of SuperUser to be available):

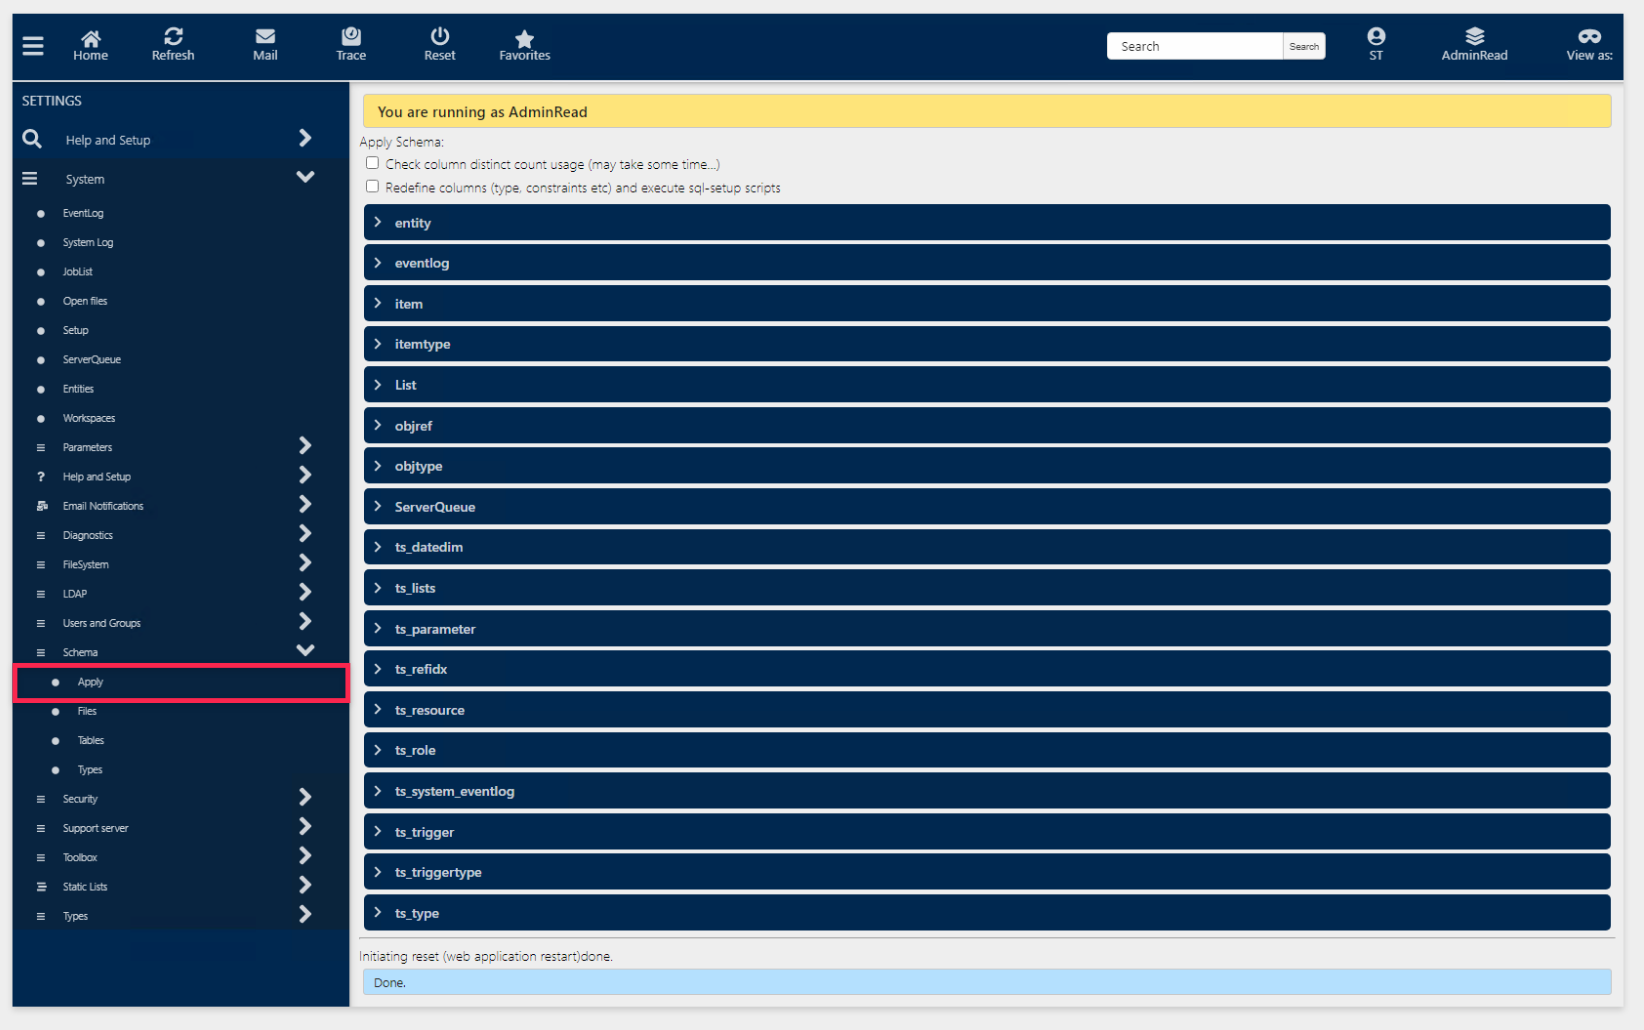
Note: If your schema changes introduces new data columns (
<column>XML schema elements), then you must access Highstage and navigate to SYSTEM > Schema and click Apply from the side navigation menu for the new data columns to be created in the Highstage SQL database (requires a minimum set userlevel of SuperUser):Please click here to read more about the configuration and usage of the
<column/>schema element.
The changes are now successfully applied to your Highstage installation.
