| Document number | Revision |
|---|---|
| DOCU12219 | 5 |
Export configuration
Export configurationBackgroundIntroductionFeaturesConfigurationAdd Export to basetypesAdd Export to subtypesBasic configurationConfigure <column> for visible columns in the Export viewConfigure columns for different item typesInherit columns from an existing <type> with the _inherit parameterConfigure default selection of files for individual item types based on file typesConfigure <output> for exportConfigure .html as output for exportConfigure .xlsx as output for exportConfigure header and footer for outputted HTML filesConfigure <static-file> to add custom files to your exportInclude static files with specific document revisionsConfigure <export> properties<export> elementDefault Export ProfileSecuritySpecify where an export profile can be accessed fromSpecify which users can make use of an export profileAdvanced customizationOverwrite the default profileUsing runtime variables in Export profilesPhysical columns as runtime variablesVirtual columns as runtime variables
Background
This article introduces you to the setup and configuration capabilities of Export in Highstage.
Introduction
Export is is bundled with Highstage and is, by default, available on all items by navigating to Options > Advanced > Export (export documentation) from an item view:
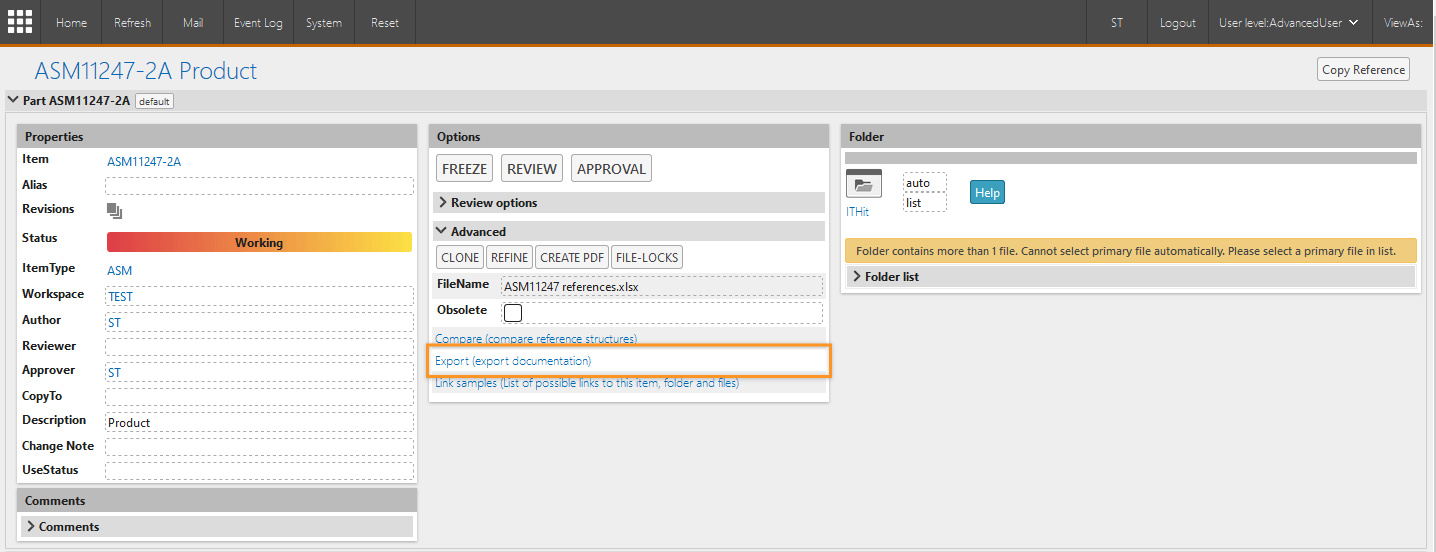
NOTE: Export requires one of the following user levels to be accessible: AdvancedUSer SuperUser AdminRead AdminWrite.
Export is a reworked feature (Implemented in version 7 of Highstage) which replaces a prior Export functionality. This Export feature provides more customization and allows for advanced configuration of export profiles, supporting a wide range of readily available settings for exporting specific items, structures, data columns, and files to various formats:

By default, Highstage comes with a preexisting Export Profile (Default). You can overwrite the default export profile and add more to the list, for easy availability of profiles for the users:

Features
Export supports the following capabilities:
- Advanced selection of items and associated files for export.
- Export .HTML and .xlsx files with a detailed overview of configured item data columns.
- Create custom export profiles to support a large variety of export presets.
Configuration
Export can be configured in a number of ways to facilitate a large number of different export profiles.
Add Export to basetypes
By adding an export profile to a specific basetype, that export profile becomes available exclusively from items of that type.
To include Export to basetypes in your Highstage installation, add the appropriate code in the custom.schema.xml.
The custom schema can be accessed by navigating to ./TS_WebApp/tweak/custom.schema.xml.
For instance, here we add a new export profile to the basetype ts_item:
<type name="ts_item"> <export name="Export profile example"> </export></type>
Export can also be added to other basetypes such as Documents, Actions or Devices by changing the <type name="BASETYPE"> attribute to reflect the appropriate basetype.
The following sample illustrates a number of different available basetypes where Export can be added:
xxxxxxxxxx<type name="part"></type> <!--PART BASETYPE--><type name="doc"></type> <!--DOCUMENT BASETYPE--><type name="action"></type> <!--ACTION BASETYPE--><type name="device"></type> <!--DEVICE BASETYPE-->
Add Export to subtypes
By adding an export profile to a specific subtype, that export profile becomes available exclusively from items of that subtype.
To include Export to subtypes in your Highstage installation, add the following snippet to the appropriate subtype schema:
xxxxxxxxxx<type name="SUBTYPE"> <export name="Export profile example for subtype"> </export></type>Here you can modify the type name="SUBTYPE" to specify which subtype you want the Export profile to be available from.
Basic configuration
The basic configuration of Export can be seen in the following snippet:
xxxxxxxxxx<type name="ts_item"> <export name="Custom Export Profile"> </export></type>Here, we have provided the following settings:
<type name="ts_item">- Made the export profile available from all items.name="Custom Export Profile"- Set custom Export Profile as our export profile name.
The Custom Export Profile is now available from all items in Highstage, and available for export for the author of the item where the Export functionality was accessed:
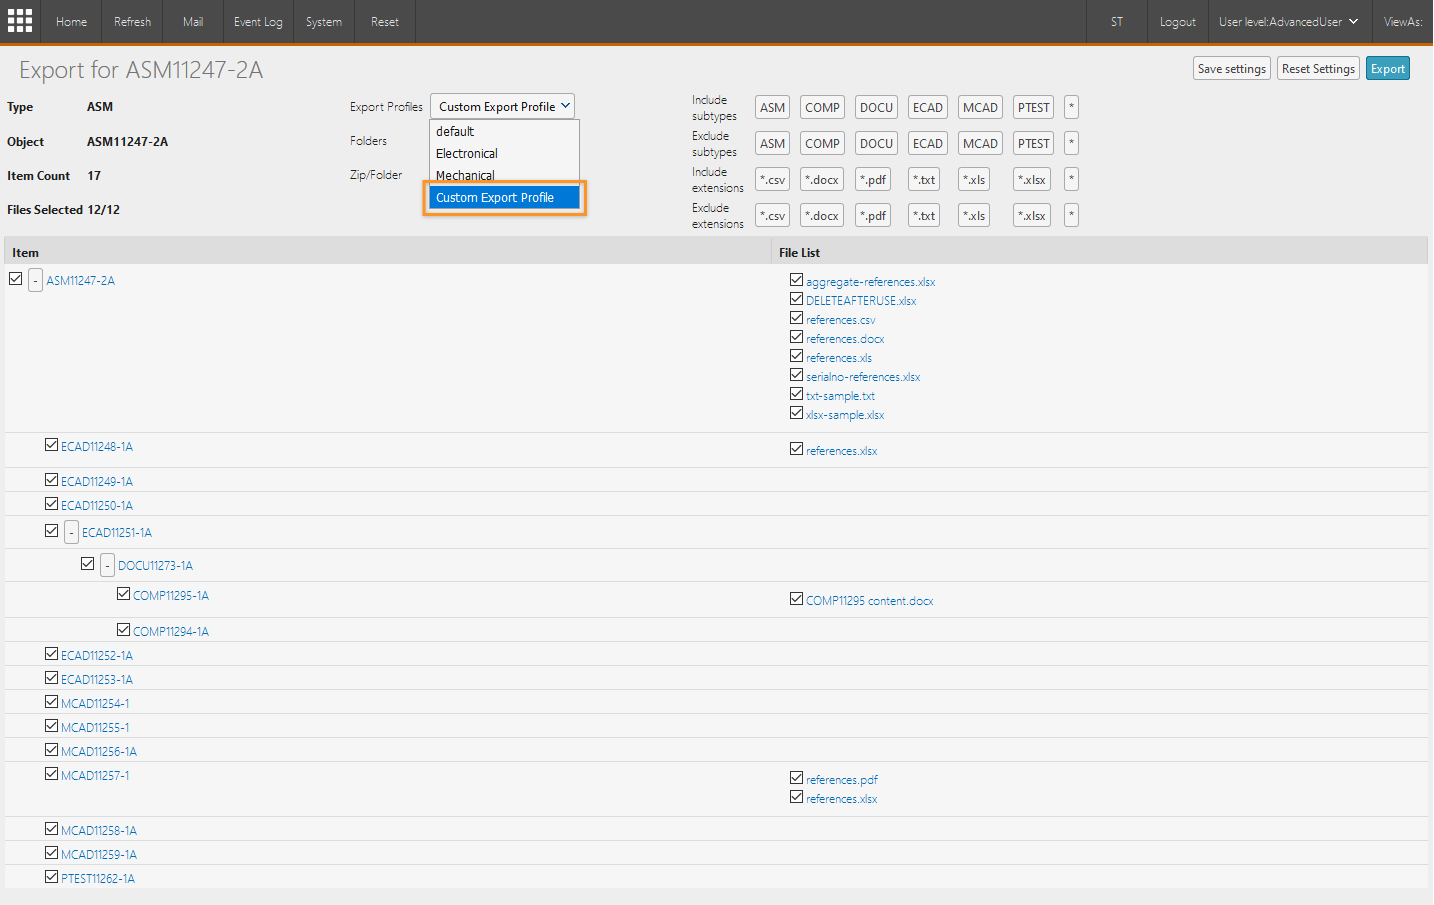
From this basic configuration, you can add a large number of different elements and attributes to further customize your export profile. For instance, notice that only the Item and File list column is visible.
In the following section, you will be introduced to the configuration of adding additional columns to your export profile.
Configure <column> for visible columns in the Export view
You can configure which data columns (item properties) you want to be visible in the grid by including a <type> element with associated <column> elements inside the <export> element.
The following snippet illustrates a select number of item columns associated with the documents in the list to be displayed:
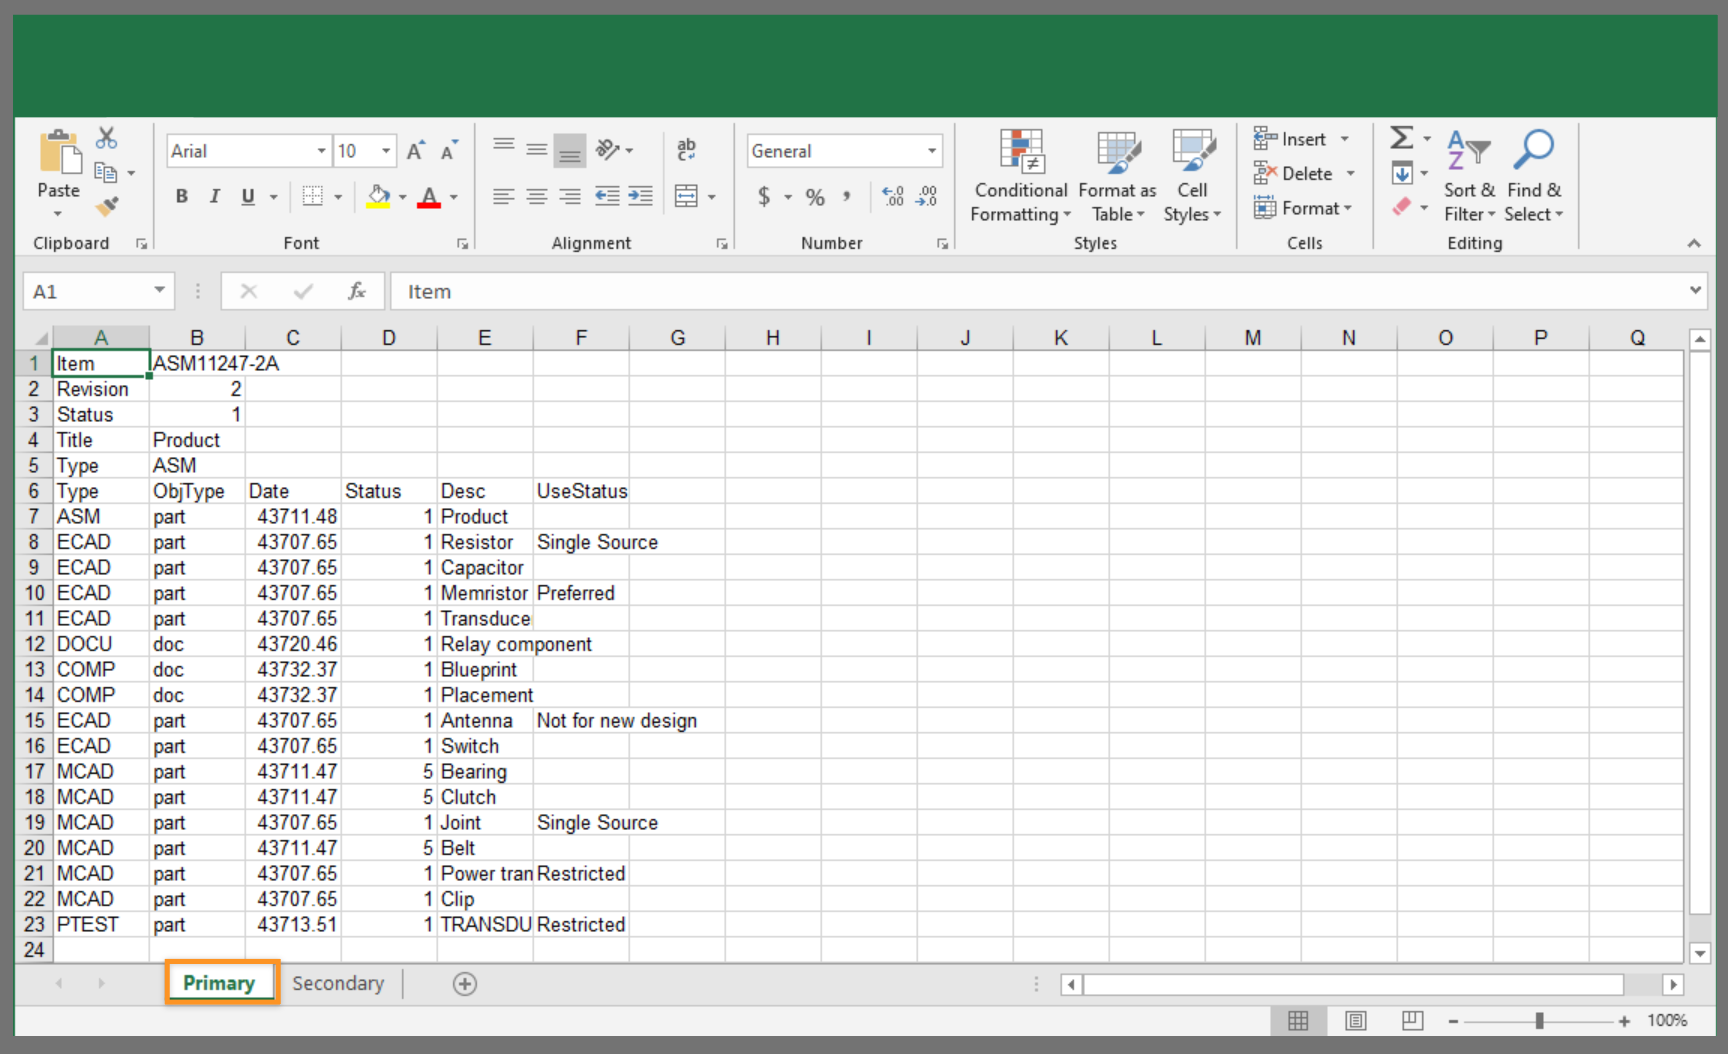
x<type name="ts_item"> <export name="Custom Export Profile"> <!-- displayed columns for documents--> <type name="doc"> <column name="itemType" title="Type"/> <column name="objtype" title="ObjType"/> <column name="eventtime" title="Date"/> <column name="status" title="Status"/> <column name="description" title="Desc"/> </type> </export></type>Notice that each <column> must include a name and title parameter. The title parameter will be used as a column header. The name parameter is used for column identification.
The following columns are now displayed for documents (doc) alongside the default item and File List columns:

Configure columns for different item types
You can also configure whether you want different or more columns for other item types in the list.
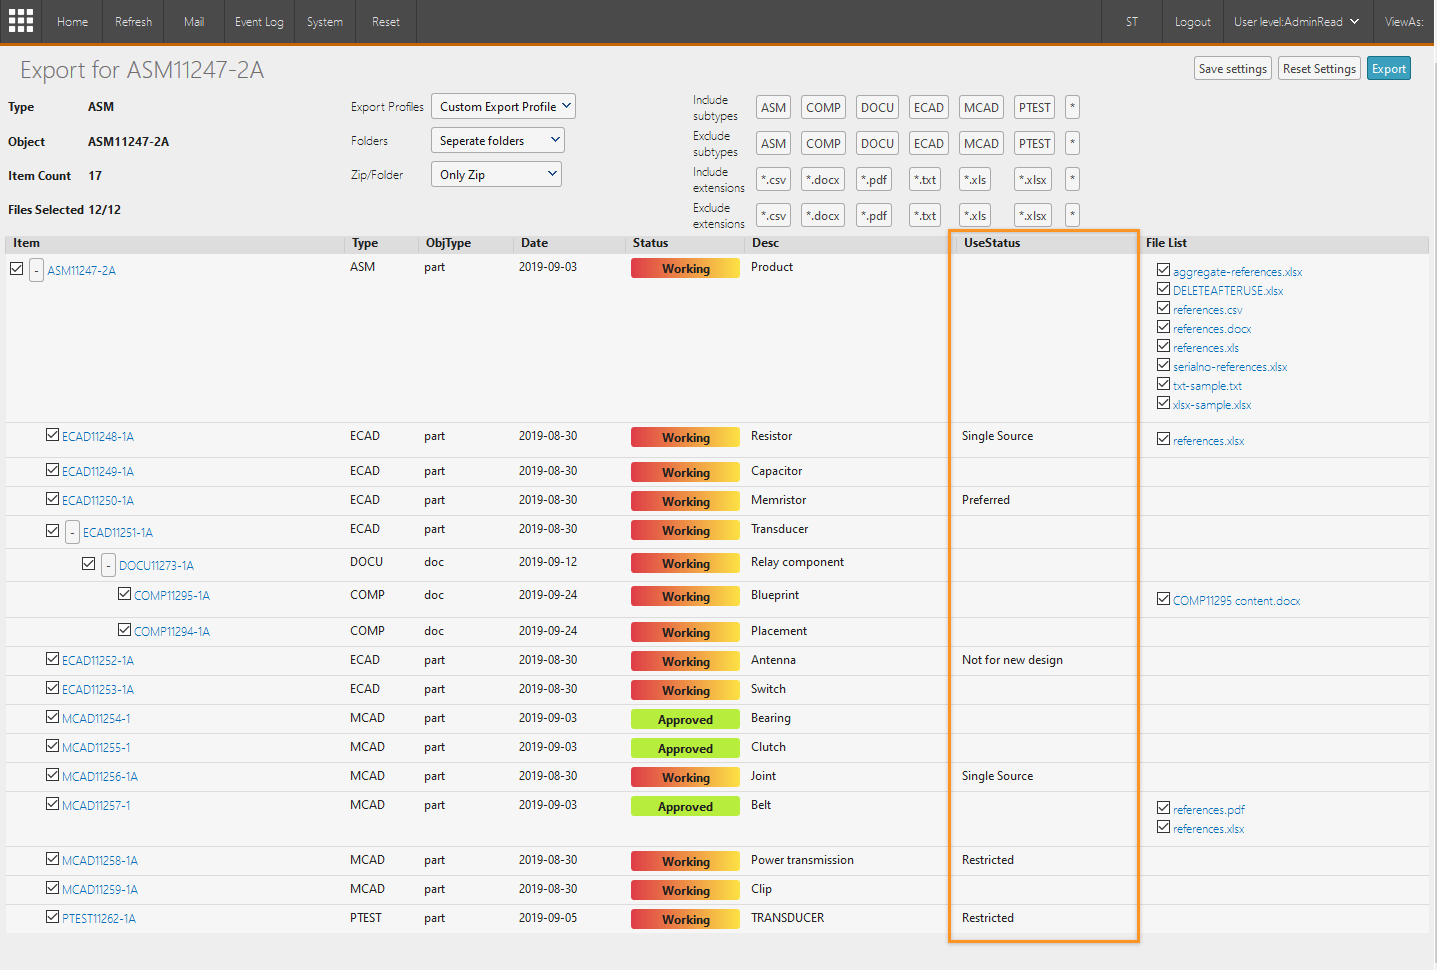
In the following snippet, we have included a second <type> element for parts where we want to list the existing columns from doc, but also add a UseStatus column for parts:
xxxxxxxxxx<type name="ts_item"> <export name="Custom Export Profile"> <!-- displayed columns for documents --> <type name="doc"> <column name="itemType" title="Type"/> <column name="objtype" title="ObjType"/> <column name="eventtime" title="Date"/> <column name="status" title="Status"/> <column name="description" title="Desc"/> </type> <!-- displayed columns for parts --> <type name="part"> <column name="itemType" title="Type"/> <column name="objtype" title="ObjType"/> <column name="eventtime" title="Date"/> <column name="status" title="Status"/> <column name="description" title="Desc"/> <column name="UseStatus" title="UseStatus"/> </type> </export></type>
This UseStatus column are now displayed for parts, in addition to the existing document columns:
Inherit columns from an existing <type> with the _inherit parameter
If you want to display the same columns for different item types in your export, you don't have to copy those same columns for each new <type> that you add to your configuration.
In the following snippet, we make use of the parameter _inherit="doc" so that we reuse the existing columns from Documents (doc) and add those to Parts (part):
xxxxxxxxxx<type name="ts_item"> <export name="Custom Export Profile"> <!-- displayed columns for documents --> <type name="doc"> <column name="itemType" title="Type"/> <column name="objtype" title="ObjType"/> <column name="eventtime" title="Date"/> <column name="status" title="Status"/> <column name="description" title="Desc"/> </type> <!-- displayed columns for parts --> <type name="part" _inherit="doc"> <column name="UseStatus" title="UseStatus"/> </type> </export></type>
Configure default selection of files for individual item types based on file types
For each item type (<type>) that you define in your export profile, you can add a pattern property to define which files (based on file type) that should be selected by default when accessing the export profile.
For instance, the following snippet ensures that only Word (.docx) files are selected by default for Documents (doc) type items and Excel (.xlsx) files are selected by default for Parts (part) type items:
xxxxxxxxxx<type name="ts_item"> <export name="Custom Export Profile"> <!-- displayed columns for documents --> <type name="doc" pattern="*.docx"> <column name="itemType" title="Type"/> <column name="objtype" title="ObjType"/> <column name="eventtime" title="Date"/> <column name="status" title="Status"/> <column name="description" title="Desc"/> </type> <!-- displayed columns for parts --> <type name="part" _inherit="doc" pattern="*.xlsx"> <column name="UseStatus" title="UseStatus"/> </type> </export></type>You can add any number of file-types to a single
patternproperty by separating them using ;.
You can always manually select other files in the file list. The pattern property only defines what is selected by default when accessing the export profile.
Configure <output> for export
By default, the output of the export is the selected files from the File List column.
You can configure which files should be generated on export in addition to the selected files from the File List, by defining one or more <output> elements within the <export> element.
You can configure which data columns (item properties) to be exported to the file by including associated <column> elements inside the <output> element.
The following output file types are currently available for export:
- .HTML
- .xlsx
It is possible to add one more more <output> elements into the <export> to allow for the generation of additional files with different item property columns.
Configure .html as output for export
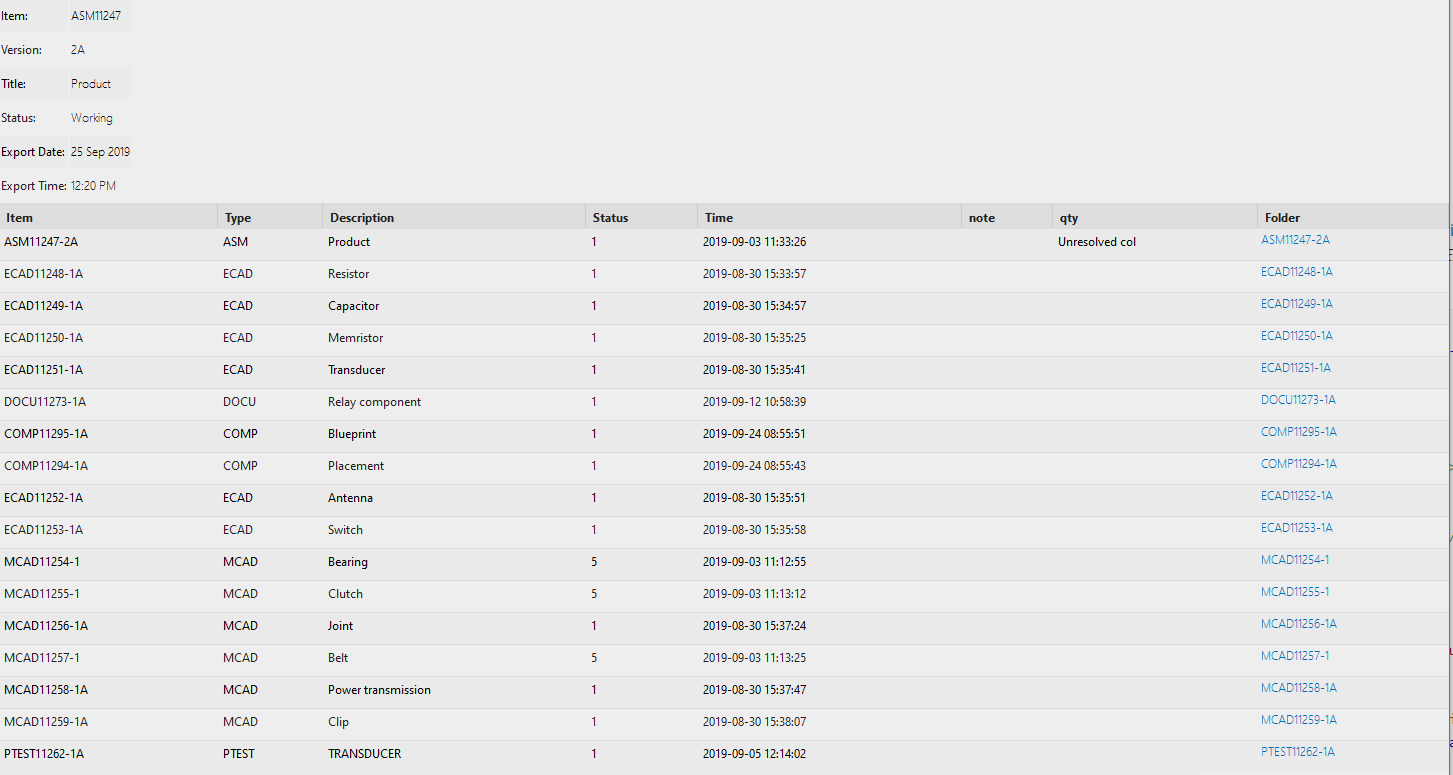
Continuing with our Custom Export Profile example, the following snippet illustrates the declaration of an <output> element which in turn outputs an .HTML file titled EXPORT, as an addition to the selected files from the File List:
xxxxxxxxxx<type name="ts_item"> <export name="Custom Export Profile"> <!-- displayed columns for documents --> <type name="doc"> <column name="itemType" title="Type"/> <column name="objtype" title="ObjType"/> <column name="eventtime" title="Date"/> <column name="status" title="Status"/> <column name="description" title="Desc"/> </type> <!-- displayed columns for parts --> <type name="part"> <column name="itemType" title="Type"/> <column name="objtype" title="ObjType"/> <column name="eventtime" title="Date"/> <column name="status" title="Status"/> <column name="description" title="Desc"/> <column name="UseStatus" title="UseStatus"/> </type> <!-- Outputs HTML file with associated item columns --> <output name="htmlExport" type="html" filename="EXPORT" > <column name="item" title="Item" /> <column name="itemtype" title="Type"/> <column name="description" title="Description"/> <column name="status" title="Status"/> <column name="eventtime" title="Time"/> <column name="note" title="note"/> <column name="ts_ref.qty" title="qty"/> </output> </export></type>
On Export, this will generate the file EXPORT.HTML, containing a number of associated property columns in addition to the folder with the selected files from the File List column:
Tip!
Notice that the columns of the output is different from the columns that are displayed in the list prior to export. This makes it easy to differentiate between item properties that should only be displayed before export for Highstage users, and the actual properties that are exported for potential external use.
Configure .xlsx as output for export
The following snippet illustrates the declaration of an <output> element which outputs a .xlsx file titled Exported xlsx.xlsx with a number of associated data columns:
xxxxxxxxxx<output name="exportXLSX" type="xlsx" filename="Exported xlsx"> <column name="itemType" title="Type"/> <column name="objtype" title="ObjType"/> <column name="eventtime" title="Date"/> <column name="status" title="Status"/> <column name="description" title="Desc"/> <column name="UseStatus" title="UseStatus"/></output>
From the snippet, the following Excel file is generated with a Report tab that includes all the listed columns:
You can add any number of additional tabs (Worksheets) in an Excel output, but adding a worksheet to your xlsx output.
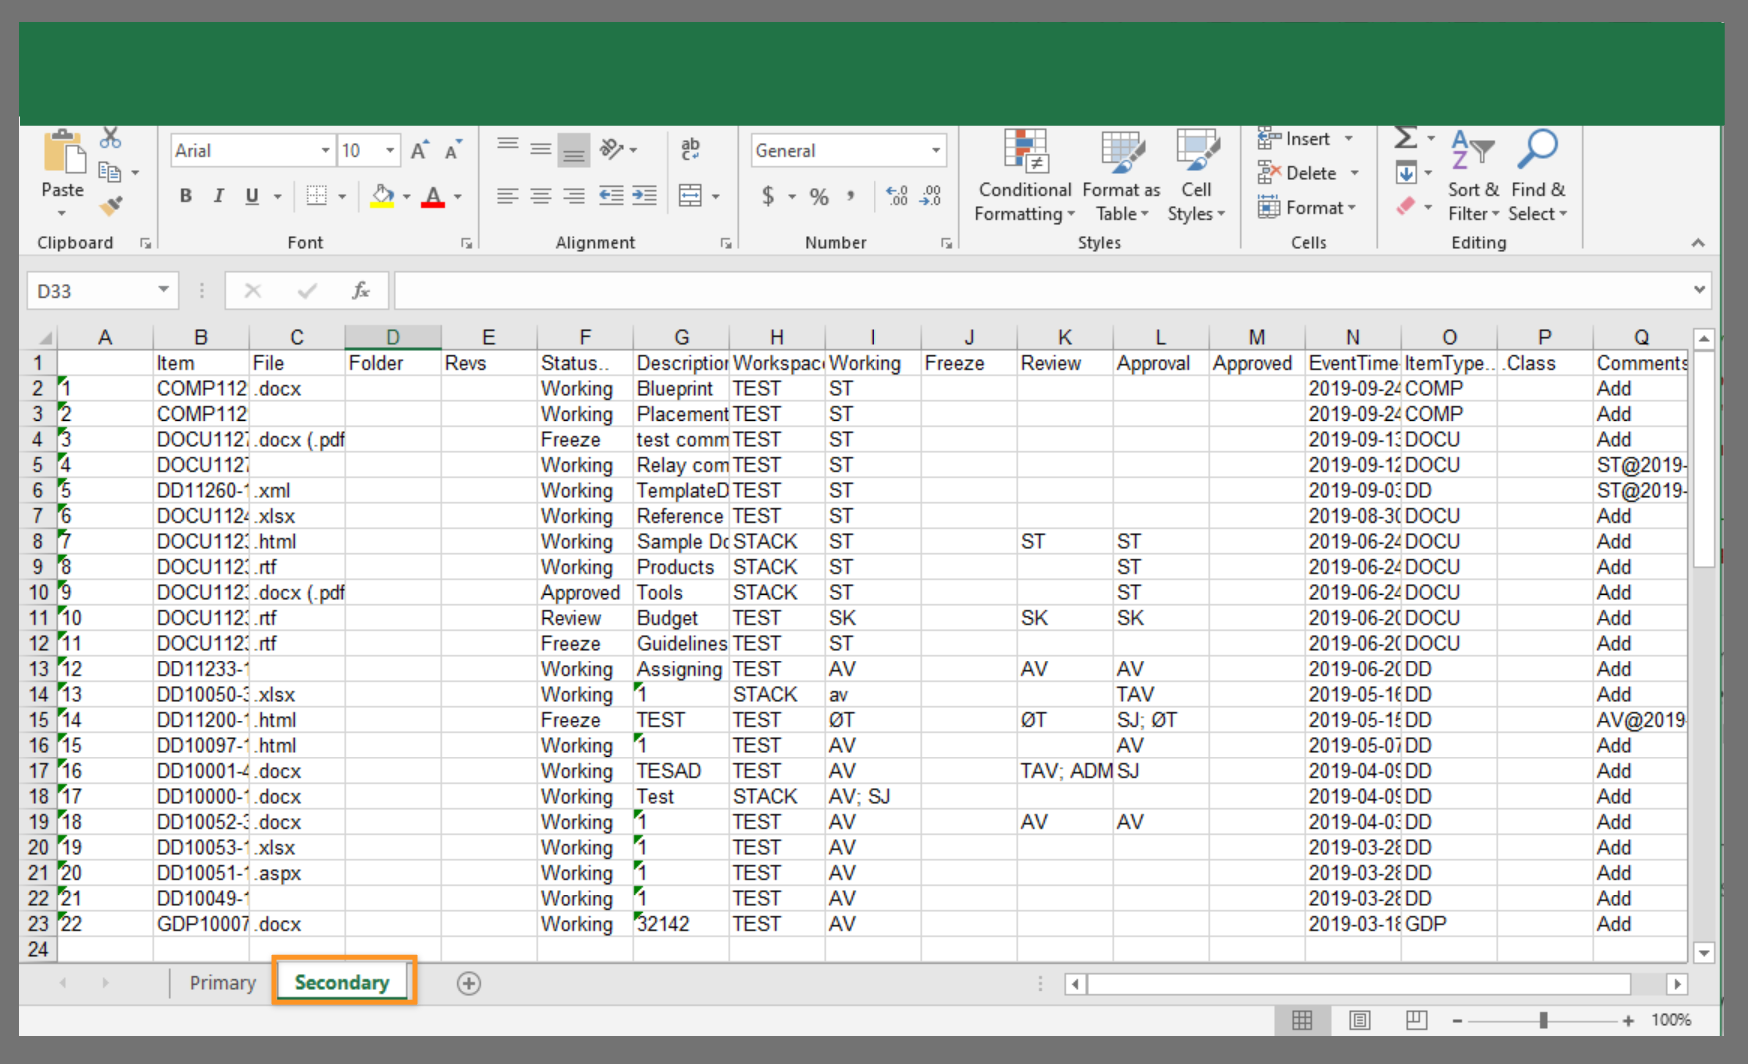
For instance, the following worksheet adds an additional tab titled Secondary which displays the items associated with the url property:
xxxxxxxxxx<worksheet name="secondary" title="Secondary" url="ts/search.aspx?t=doc" />The following tab in the Excel (.xlsx) file is generated:
Any search URL can be inserted into the url property in the <worksheet> element, to add any list of items to a new tab in the Excel sheet.
For instance, the following URL property url="/ts/search.aspx?&t=doc&status=%3D"Working"" only retrieves documents in Working state.
IMPORTANT!: If there are any occurring
&characters in the copied URL, ensure that you replace all occurrences with&.For instance, the URL
ts/search.aspx?&t=doc&itemtype=DOCUmust be changed tots/search.aspx?&t=doc&itemtype=DOCUto avoid errors in Highstage.
Configure header and footer for outputted HTML files
For the outputted .html files, you can customize the header and footer element.
To to so, you can use an <xhtml> element within the <output> element, with the name value set to header or footer.
Within the <xhtml> element, you input character data (CDATA) . This allows for you to insert basic HTML to your header/footer elements.
The following sample adds both header and a footer to an outputted HTML file:
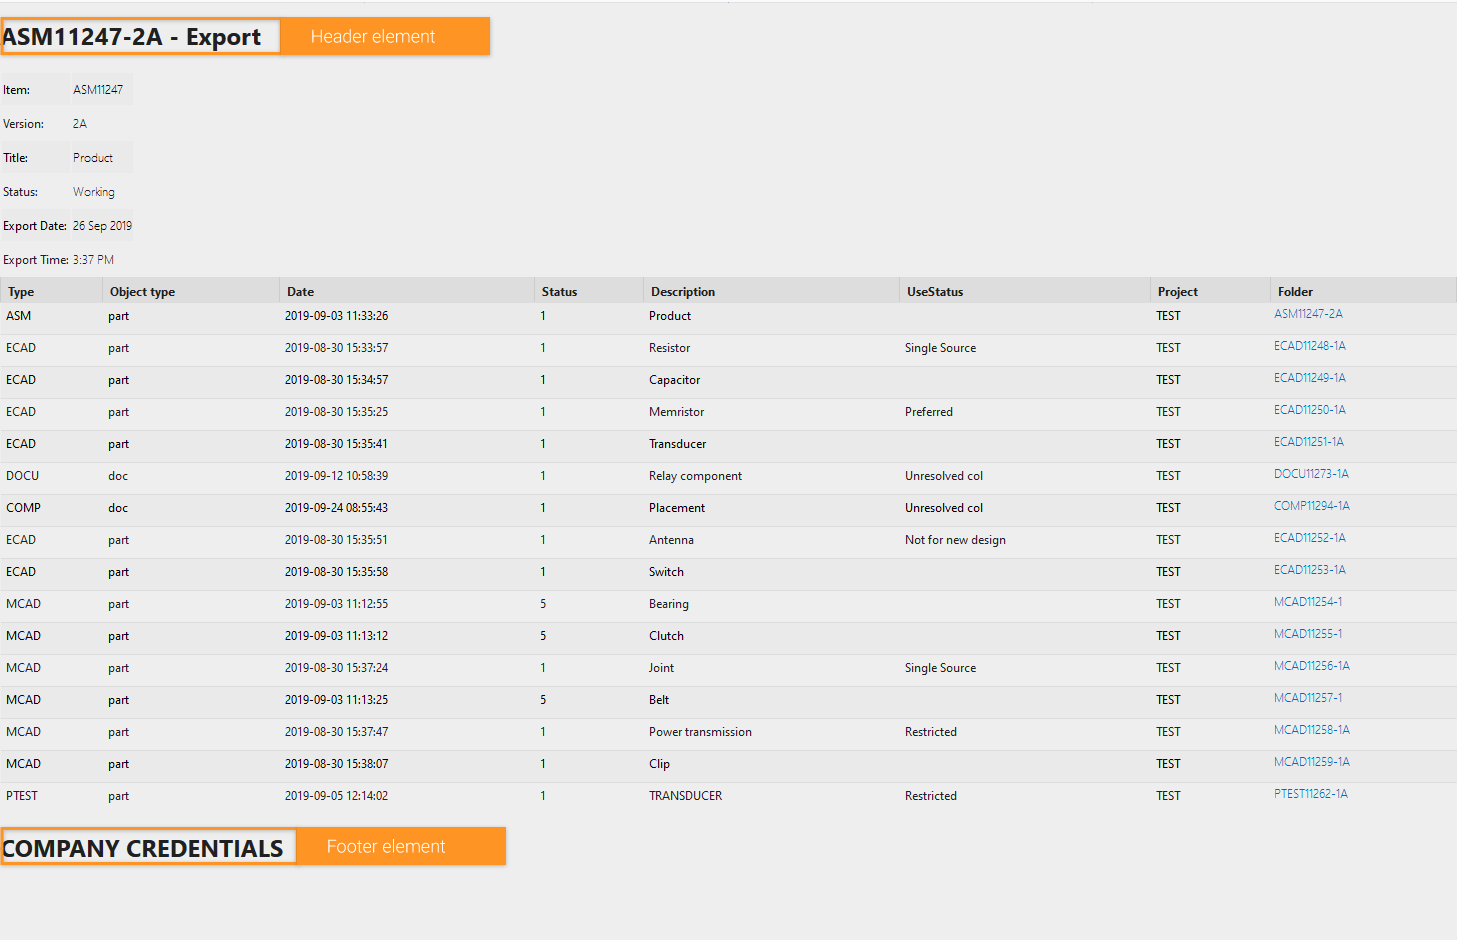
xxxxxxxxxx <!-- Export HTML file --> <output name="html" filename="@[data:item] -Export"> <column name="itemType" title="Type"/> <column name="objtype" title="Object type"/> <column name="eventtime" title="Date"/> <column name="status" title="Status"/> <column name="description" title="Description"/> <column name="UseStatus" title="UseStatus" /> <column name="workspace" title="Project"/> <!--Header element--> <xhtml name="header"> <![CDATA[ <h1>@[data:item] - Export</h1> ]]> </xhtml> <!--Footer element--> <xhtml name="footer"> <![CDATA[ <h1>COMPANY CREDENTIALS</h1> ]]> </xhtml> </output>
The following .HTML output file are then exported:
Tip! You can include item properties as well as HTML elements within the CDATA element:
<![CDATA[ ]]>to further customize your document headers and footers. In our example, we used@[data:item]to make use of the item ID.
Configure <static-file> to add custom files to your export
Export outputs a tree-view of items and associated files and columns for export from a parent item. Should you wish to append additional items and documents to the export outside of this 'tree' of items, you can use the <static-file element.
This element allows for you to define one or more 'external' items and associated files to be available in your export. This can, for instance, be documents that explains the purpose of the various columns and files for external stakeholders.
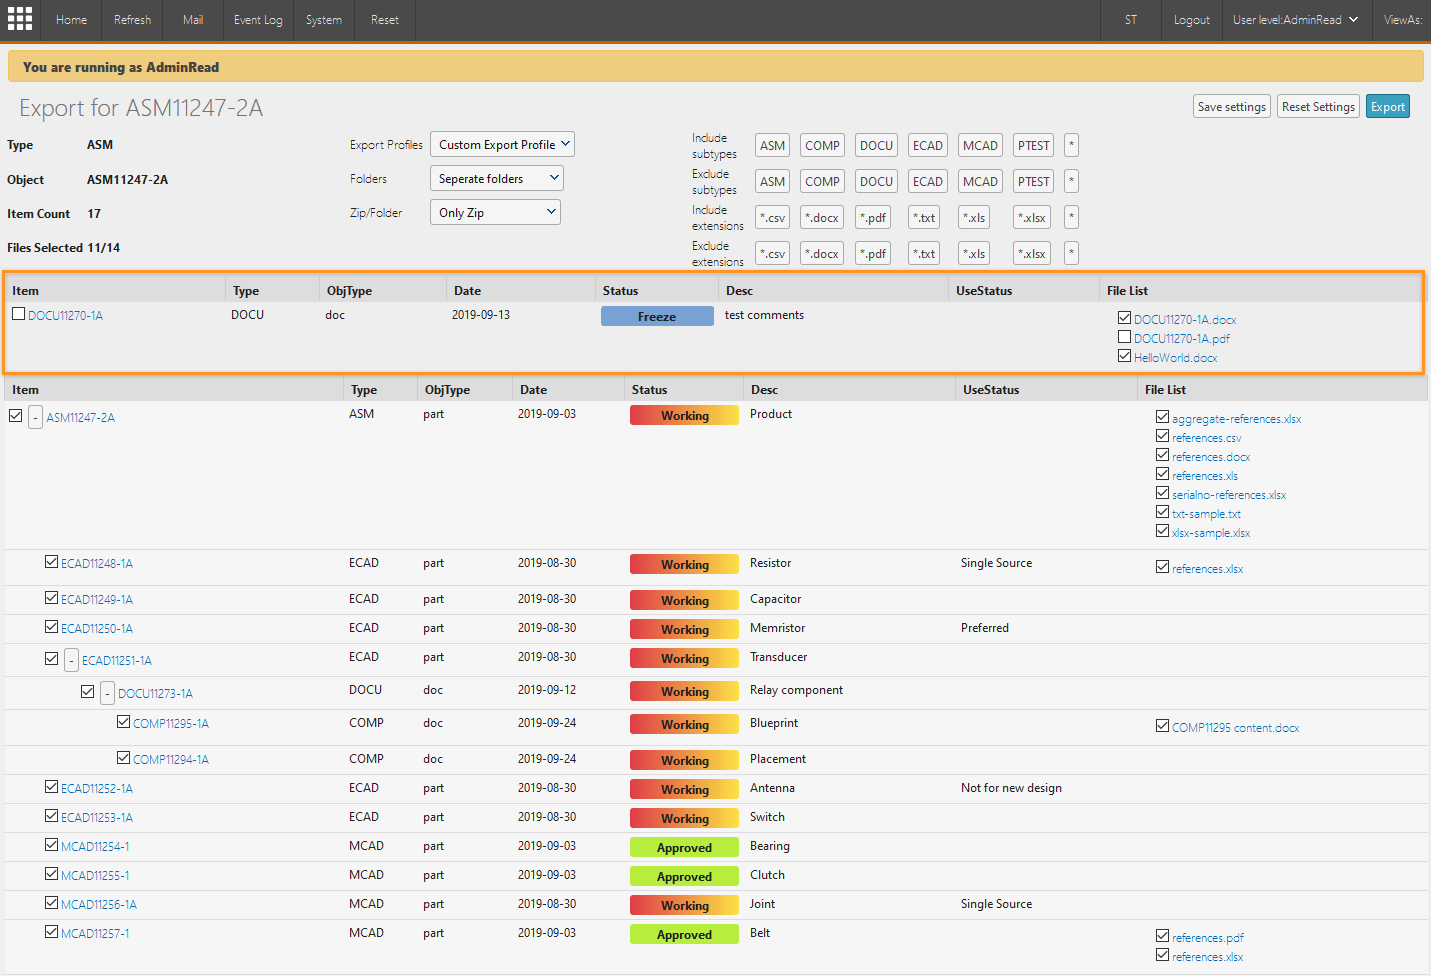
Adding the following snippet within the <export> element includes all .docx files from the item with ID DOCU11270-1A:
xxxxxxxxxx<static-file name="export-desc" obj="DOCU11270-1A" objtype="doc" pattern="*.docx"/>
The .docx files from item DOCU11270-1Aare now added to the export:
You can include any number of \<static-file> elements to an export profile.
<static-file> properties description:
| Property | Description | Examples | Required |
|---|---|---|---|
name | Unique name declaration of the <static-file> element. | name="ExportGuide" | ✔️ |
obj | The ID of the item containing files to be included for export | (Example) Item with specific revision:obj="DOCU11270-1A"(Example) Item without revision: obj="DOCU11270". | ✔️ |
objtype | Specifies the basetype (action / doc / part / device) of the item. | objtype="doc" | ✔️ |
pattern | Determines which files are available for export as static files. The files that are not explicitly declared in the pattern property are omitted from the file list completely, and therefore unavailable for export | Make all files associated with the item available for export:pattern="*"Make all .PDF files available for export: pattern="*.pdf"Make all .xlsx files available for export: export=*.xlsx"Make a specific file available for export: pattern="document.docx" | ✔️ |
filter | Determine which version of items and documents to be added as static files for export based on existing filters. (Remember to remove the revision from the obj property. Referring to a specific revision of an item in the obj property whilst setting a filter to another version will give an error.) | (Example) Use the latest approved version of a document as a static file:filter="latestapproved"(Example) Use the latest version of a document: filter="latest" |
Include static files with specific document revisions
If you want, you can include static files based on a filter to select a specific revision of files to be included.
As another example, the following snippet illustrates the use of a filter, to ensure that we use the latest approved version of the .docx document as a static file for export:
xxxxxxxxxx<static-file name="export-desc" obj="DOCU11270" objtype="doc" pattern="*.docx" filter="latestapproved"/>notice that we have removed the version from the obj property and added the property filter="latestapproved". Any revision filter such as latest, latestapproved or latestinworking can be used.
Configure <export> properties
We have explored the configuration capabilities of the <column> elements for displaying item columns in the Export view, and the configuration capabilities of the <output> element for exporting selected files and item properties as .html and .xlsx files.
Similarly, a number of properties can be added to an <export> element to define:
- Security (Access requirements for the export profile)
- Availability for export (Which files and items are available for export)
- Selection behavior (How files and items are selected in the column grid for export)
- Folder name customization (The name of the folder(s) containing exported files)
These settings can be different for each defined export profile.
The following snippet illustrates examples of use of all available parameters for the <export> element:
xxxxxxxxxx<export name="default" trustees-extended="activeresource1" trustees-express="teammember" deep="1" includeTypes="DOCU;ASM;GD" excludeTypes="PLA;IDA" file-pattern="*.pdf;*.html" package-name="@[data:item] - Export]" selection-mode="1" load-settings="1" expanded-levels="2"></export>
Name Defines the ID and name of the export profile.
Trustees-extended Specifies the user level requirement for using the export profile.
Trustees-express Allows users with a specific user level to be able to export with a user profile, with pre-defined selection of items and documents.
Deep Determines whether children of parent items are not displayed and available for export (
deep="0"). Or if children of parent items are displayed for export (deep="1").includeTypes Specify any number of types (base- and subtypes) to be included in the export. Any items and it's associated children (referenced items) that are not of that type will be excluded from export.
excludeTypes Specify any number of types (base- and subtypes) to be excluded from the export. Notice that any associated children (referenced items) will be excluded from export as well.
file-pattern Defines a number of file types or specific files (ex. txt, xlsx, pp, docx, sample.txt) to be listed for export. All other files and file types are excluded from the file list completely, and cannot be selected for export.
package-name Define the name of the exported folder containing all the exported files from the file list.
selection-mode Defines the rules for selecting items in the export column grid.
The following modes are available:
Mode Sample Description 0 ( selection-mode="0")Select/deselect individual items and individual files for export 1 ( selection-mode="1")Selecting/deselecting a parent item also selects/deselects the associated files and the children item and files.
Selecting/deselecting a child item also selects/deselects the parent items and files.2 ( selection-mode="2")Selecting/deselecting parent items also selects/deselects children items and files. 3 ( selection-mode="3")Selecting/deselecting Children items also selects/deselects the parent items and files. load-settings when accessing an export profile, specify whether you want to load the default selection of items and files based on the export profile configuration or if you want to load the selection of items and files based on any existing saved settings.
Expanded-levels When loading an export profile, this property defines how many 'levels' of items in the list are expanded or disbanded by default.
A detailed description of the available attributes and supported values for <export> elements can be found in the <export> element chapter.
<export> element
The following list provides a thorough overview of the functionality associated with the attributes and elements of the <export> element.
Attributes:
| Property | Description | Example | Required |
|---|---|---|---|
name | Unique name of the export profile. Will be used at the title for the export profile | (Example) name="Assembly" | ✔️ |
trustees-extended | Define trustees (any number of vector roles) to be able to access, modify and export selection. | (Example #1) Sets author as required permission for using export profile: truestees-extended="activeresource1" (Example #2) Sets any user to be able to use the export profile: trustees-extended="user" | ✔️ |
trustees-express | Define trustees (any number of vector roles) to be able to access and export selection. These trustees do not have access to the item/file list selection and can only export the default selection of items and files as a 'quick export'. | (Example #1) Sets team members to able to make an 'express' export for this export profile: trustees-express="teammember" | ❌ |
deep | Enable or disable whether children (referenced items of the parent items) is available for export. | Disabled: deep="0" Enabled: deep="1" | ❌ |
includeTypes | Specify explicitly which item of types (basetypes and/or subtypes) is available for export. All other item types are omitted from the list and makes items with those types unavailable for export. If a parent item is unavailable, so are the child items | Default: Make all documents, parts and actions available for export: includeTypes="*" (Example #1) Make ASM and GD item types available for export: includeTypes="ASM;GD" (Example #2) Make all documents (doc) and parts (part) available for export: includeTypes="doc;part" | ❌ |
excludeTypes | Specify which item of type (basetypes and/or subtypes) is explicitly unavailable for export. | (Example #1) Items of type *GD* and *PRD* is omitted from the export list completely, and cannot be exported: excludeTypes="GD;PRD" | ❌ |
file-pattern | Selecting the associated export profile will select all files with the declared file-pattern file type(s) for export. Files that are not of the specified type(s) will be deselected by default, but can be manually selected. | (Example) Selects all .txt files for export: file-pattern="*.txt" (Example) Selects all .xlsx and .csv files for export: file-pattern="*.xlsx;*.csv" (Example) Selects a specific file for export: file-pattern="example.txt" | ❌ |
package-name | Name of the exported folder (Item properties can be included in the folder name using @[data:xx] ) | (Example #1) Example using the export parent item ID and export date: package name="@[data:item] - Export (@[date])" | ❌ |
selection-mode | Specifies the item(s) and file(s) select/deselect behavior. (By default, selecting files will always select the associated item for export) | selection-mode="0":Select items and files individually for export. selection-mode="1":Selecting/deselecting parent items will also select/deselect child items and associated files. Selecting child items will also select the parent item for export. selection-mode="2": Selecting/deselecting a parent item will also include/exclude all child elements and associated files for export (files are affected).selection-mode="3":Selecting a child item will also select parent items for export (files are not affected). | ❌ |
load-settings | Enables or disables whether the saved settings is loaded by default when accessing the export profile. | Enable: load-settings="1"Disable (): load-settings="0" | ❌ |
expanded-levels | Specifies the default number of expanded columns when loading an export profile. | (Example):expanded-levels="2" loads the first two 'levels' in the item hierarchy of an export. | ❌ |
Elements:
| Name | Description | Required |
|---|---|---|
<type> | Defines item type (ex. ts_item/doc/part/device) and visible data columns (<column>) for the items to be listed in the export grid view. | ✔️ |
<output> | Defines the output file format, file name, and associated data columns to be exported. | ❌ |
<static-file> | Include any number of files to be included for export. | ❌ |
Default Export Profile
The following default profile is available as a standard for export in Highstage:
xxxxxxxxxx<type name="ts_item"> <export name="default" includeTypes="*" excludeTypes="" file-pattern="*" trustees-extended="Resources;mananger;SuperUser;AdminRead;AdminWrite" trustees-express="teammember" load-settings="0" deep="1" package-name="@[data:item] - Export (@[date])" selection-mode="1" expanded-levels="*"> <type name="doc" pattern="*"> <column name="itemType" title="Type" /> <column name="objtype" title="Object type" /> <column name="eventtime" title="Date" /> <column name="status" title="Status" /> <column name="description" title="Description" /> </type> <type name="part" _inherit="doc" pattern="*"> <column name="UseStatus" title="UseStatus" /> <column name="workspace" title="Project" /> </type> <!-- Exported HTML --> <output name="htmlOutput" type="html" filename="@[data:item] - Export (@[date])"> <column name="item" title="Item" /> <column name="itemType" title="Type" /> <column name="objtype" title="Object type" /> <column name="eventtime" title="Date" /> <column name="status" title="Status" /> <column name="description" title="Description" /> <column name="UseStatus" title="UseStatus" /> <column name="workspace" title="Project" /> <!-- Header element --> <xhtml name="header"> <![CDATA[ <h1 style="text-align:center">@[data:item] - Export (@[date])</h1> ]]> </xhtml> <!-- Footer element --> <xhtml name="footer"> <![CDATA[ <h3 style="text-align:center">Exported with Highstage</h3> ]]> </xhtml> </output> <!-- Exported EXCEL --> <output name="xlsxOutput" type="xlsx" filename="@[data:item] - Export (@[date])"> <column name="item" title="Item" /> <column name="itemType" title="Type" /> <column name="objtype" title="Object type" /> <column name="eventtime" title="Date" /> <column name="status" title="Status" /> <column name="description" title="Description" /> <column name="UseStatus" title="UseStatus" /> <column name="workspace" title="Project" /> </output> </export></type>
Tip!
You can make any changes to the Default profile by creating your own export profile in your
custom.schema.xmland setting the name parameter of the<output>element as default:xxxxxxxxxx<export name="default"></export>This replaces the existing elements and attributes with your changes.
Security
There are three distinct aspects to the accessibility and security of using export:
- The
typeelement surrounding an<export>determines from which item type(s) that an export profile can be accessed from. - The
trustees-extendedattribute of an<export>element determines which users who explicitly can use an export profile. - Standard Highstage security is enforced. Even if a user has access to an export profile - only items and files that are already available to that user are listed for export. Items and files that a user does not have access to are omitted from the export list altogether.
Specify where an export profile can be accessed from
An <export> element must be placed within a \<type> element. Thus, declaring a specific type will ensure that an export profile will be available only when accessing an item of that type.
An export profile available for all items:
xxxxxxxxxx<type name="ts_item"> <export name="Export"> ... </export></type>An export only available from Documents:
xxxxxxxxxx<type name="doc"> <export name="Document_Export"> ... </export></type>An export only available for Parts:
xxxxxxxxxx<type name="part"> <export name="Part_Export"> ... </export></type>
Specify which users can make use of an export profile
The trustees-extended attribute from the <export> element determines which users, in general, who has access to an export profile. All available vector roles can be used as values to determine security.
Example where any user running as AdvancedUser has access to an export profile:
xxxxxxxxxx<export name="default" trustees-extended="AdvancedUser"></export>you can read about the trustees-extended attribute here.
Advanced customization
Overwrite the default profile
If you want complete control of the Default profile, and build it from scratch, you can use the parameter _overwrite="1" to ensure that nothing from the bundled profile is used:
xxxxxxxxxx<export name="default" _overwrite="1"></export>This requires that you set up the various elements and parameters for Export to function as all existing elements and attributes are removed.
Using runtime variables in Export profiles
Physical columns as runtime variables
You can make use of runtime variables throughout Export profiles to dynamically refer to column contents in the following manner:
xxxxxxxxxx@[data:COLUMNNAME]Note: Replace COLUMNNAME with the name of the appropriate column.
Example:
xxxxxxxxxx <output name="output" filename="@[data:item] - Export (@[date])"> </output>
Virtual columns as runtime variables
Within the scope of the <export> element, you must declare any runtime variable which refers specifically to virtual columns, in the following manner:
xxxxxxxxxx@[data-virtual:COLUMNNAME]Note: Replace COLUMNNAME with the name of the appropriate virtual column.
Example:
xxxxxxxxxx <output name="output" filename="@[data-virtual:status]"> </output>
